In the practice of working with items, there are often a large number of “no answer” on which operators spend lots of time: open an order, call, listen to music or an answering machine, write a comment about the dialer, and proceed to the next order. When there are hundreds and thousands of such orders, these are hours of worthless work. In the case of calls in conflict situations, when customers refuse to buyout parcels, dissatisfied with operator’s persistent calls, and sometimes talk to operators rudely and humiliate them. Some operators lose their temper, may unconditionally agree with the client, interrupt the call or be rude in response. We found a technical solution to these problems.
A robot is a functionality that can much increase the efficiency of operators, providing ability to process a third more orders without expanding staff.
A robot calls for orders and plans a new in accordance with the status of the call and set rules for it.
Contact our specialists via tickets if you want a robot to be adjusted by our agents. You specify: 1) In what status does the robot call. 2) Which template it use. 3) What does the client do: a) press a key (it is not necessary to use it in a template); b) listening to the robot to the end or not; c) if the robot did not reach the client (here it is understood how often robot will call and at what time of the day (for example, from 9 to 20), and how long (how many days))
How to set up ringing by the robot yourself.
If you have already connected and tested telephony, you can skip this step. If you need to make a connection, enter your project - Settings - Telephony - fill in fields with the necessary data, more ...
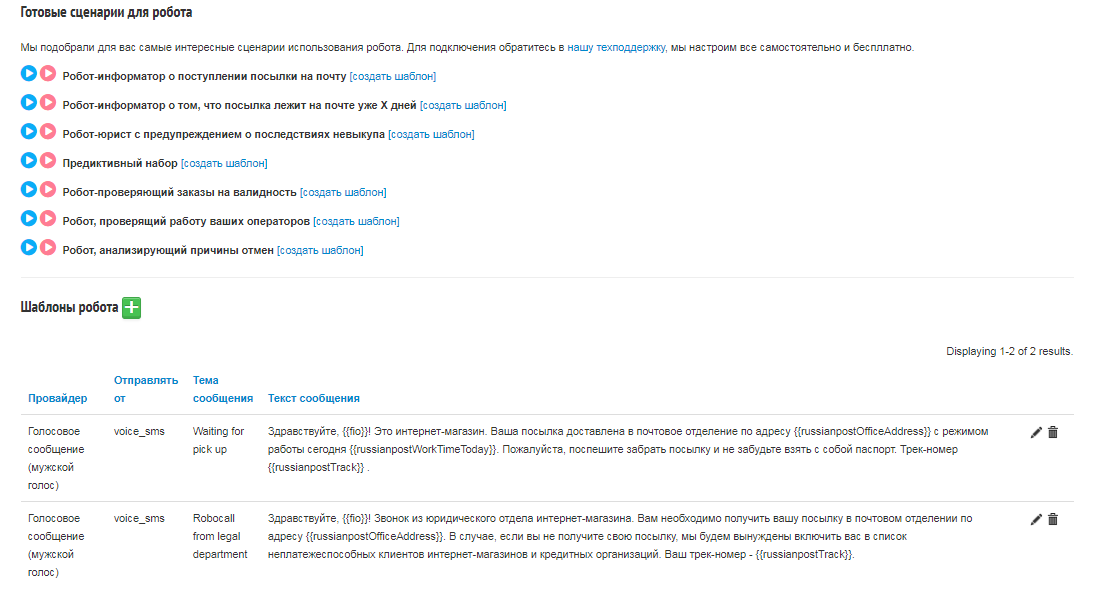
At this stage, you need to add a template with which robot will call. The project has a Robot menu – Robo call Templates.
We have selected for you the most interesting scenarios for using the robot and made them available for listening. You can choose which voice option you like best (male or female voice) and create such a template by clicking on the appropriate option next to each scenario. In the template editing window, you can change text of the message at your discretion, select a voice and create a template.

You can also create your own template from scratch. And later edit it or delete it.

In the text of a message, you can use special tags that loads information from an order card. A list of available tags is displayed in the text of the message in the message editor on a blue background. Copy the tag directly in the list and paste into your template.
You can set special rules for the robot, according which robot will perform necessary action with an order or will plan a next call.
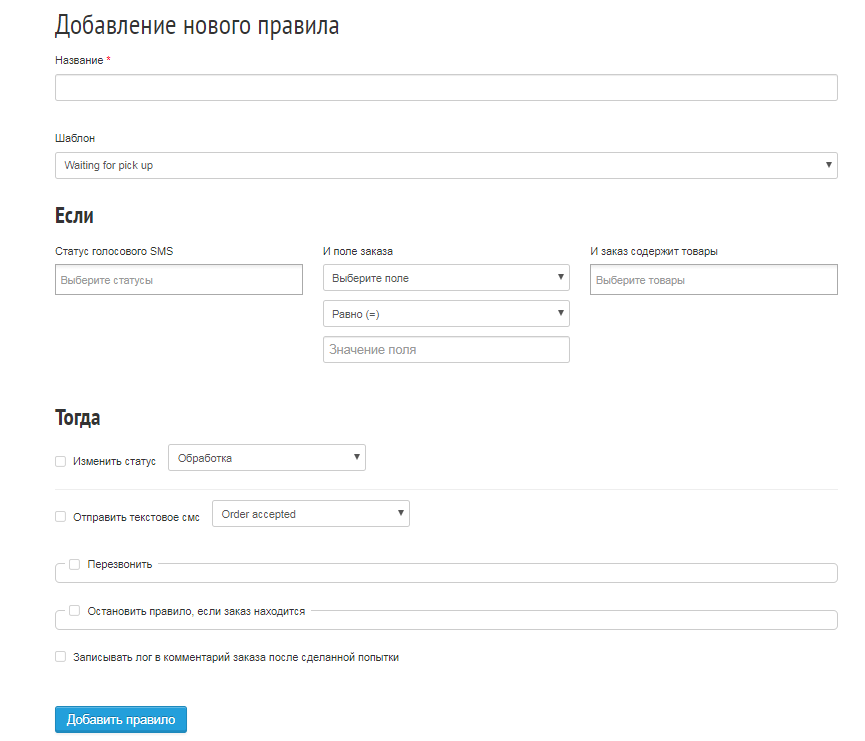
To add a rule - click “Robot” button in the project - Robo-dial rules - Adding a new rule. When adding a rule, name it and select the template for which you are creating this rule (just when calling with such a template, this rule will work if all terms are implemented). For example:

Next, set the terms when this rule should work for the robot to perform certain actions - the “If” block.
“Voice SMS Status” - the dial status for the robot. Here you can select one or several values at once.
“And the order field” is an option that allows you to set terms for this rule will to work if the value in the selected field (field from the order card) is more, less or equal to settings specified in the rule.
“And the order contains the goods” - here you can select one or several values at once.
When the terms for triggering the rule are set, you can enable an actions that robot performs according to this rule - the “Then” block.
“Change status” - the robot will move the order to the necessary status. Enable the option by ticking and select the status to move from the drop-down list.
“Send text sms” - after making a call, the robot will send a text sms according to the specified pattern.
In the “Call back” box, insert the time after which the robot will make the next dial attempt and select the template which robot will use for calling back. Restrict robot’s trials to get through to client by time in UTS and set the number of dialing attempts.
The “Stop the rule if the order is located” block enables / disables the robot rule in the selected statuses.
The item “in all but selected” - the robot will call only in the selected status.
The item “in selected statuses” - the robot calls in all statuses, but stops the rule (calling) if the order gets into the selected status.
We recommend adding separate rules for different voice message delivery statuses, and separate rules for a pressing key.
Enable automatic robo calls sending for necessary statuses. Open Settings - Statuses - select status you need - edit (pencil). In the status settings, enable the option “Always send auto SMS” and select the desired template in the drop-down list.
If you have enabled auto-sending for statuses that already have orders, or if you want to start the robot manually, send voice messages in bulk to all orders in the status via the “Send SMS” button under the table with orders in the admin account.